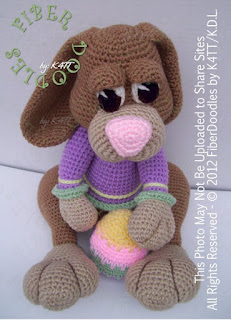
and so does JellyBean..
but what are they? do I have to sew them on? Ugh! I don't understand!!
Let me make it easy for you!
Creating the look of layers is easier and less time-consuming that actually creating layering.
If you want a plushy to look like he's wearing pants, or a sweater - you have 2 choices. You can either create a separate item of clothing, or you can incorporated it into the design itself by making use of color changes.
The problem with creating an entirely separate item (aside from the measurements and joining - which would be more the designer's headache), is that you'll be doing twice the work.
The issue with a simple color change... is that it often looks like just that, a simple color change...
but when you add depth to it, you change the entire perception of the project.
Notice how the cuff's and waistlines make the clothing on these plushies appear removable.
Although these are not the actual instructions for either project, the principle behind the look is the same. Those who are scratching their head wondering how to accomplish this look..
Here you go :)
So here is your simple round - instructions will tell you where (or if you are ad-libbing, you'll decide on your own where you want a sweater to hit the belly, cuff to hit arm, etc)
But let's say for the sake of argument - the variegated yarn represents the animal/doll body and the flat color will represent the 'item of clothing'
so, the pattern reads Rnds 1-4 have increases of 8 per rnd - so here at the end of Rnd 4 we have a total of 32 sts.
Instructions for Round 5 state that you are to crochet (most often with a new color) in the FRONT loops only - single crocheting in each of the next 3 sts and Increasing in each 4th stitch, 8 times for a total of 40 sts at the completion of this round.
So that is what you do, crochet the round according to the instructions. Why? because you will NEED those unworked backloops ... eventually...
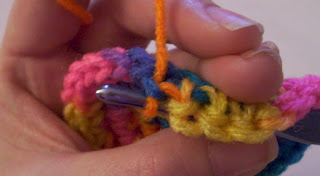
around and around..
and from the "wrong side"...
but then you have to take 40 single crochet stitches back down to 32 single crochet stitches, while rejoining this to the round that only has 32 sts -
Hey ... wait a minute! There is no corresponding stitch for Rnd 4, it only has 32 stitches, and Rnd 6 has 40..
Now what? You are going to need to decrease, but how will that work?
Overall, most stitches will be made from the current round (2 loops) and the reserved back loop of Rnd 4 (1 loop) and drawing the yarn through all these loops to reconnect the piece and create a 'layered' look. But what of the needed decreases?
Many people are familiar with a "hacked stitch" that was created by crocheters called the "invisible decrease" - this method of decreasing using only the front loops of the 2 stitches being decreased instead of using the entire stitch.
This, lessens the bulk in the decrease and creates a nicer looking stitch overall (and, in theory, with less bulk, the decrease is less noticeable.)
This is what is depicted in the photos above; and in most instances, yarn over and drawing through all loops on the hook would produce the (invisible) decrease - but for our purposes, we need to rejoin this flapping rnd with the rest of the project..
so at this point, before yarning over, you will want to add one more 'loop' to the hook.. that of the reserved back loop from rnd 4 - (the variegated round in this tutorial).
NOW, yarn over and draw through all the loops on the hook.
and another look.. from a different angle (the photo below is just a single crochet rejoining and NOT a decrease)
continue to work the pattern with single crochet and this 'invisible' decrease until end. **Note, the last 2 stitches placed will take PATIENCE, they will be the most difficult to work into the round, so make sure before you continue on with the pattern, count your stitches and make sure your count is accurate.
and all done..
you work the rest of the pattern as written, but when it's all done, you get a result that looks like this...
Page Updated on: 2 September 2020
✦⋆✦⋆✦⋆✦⋆✦⋆✦⋆✦⋆✦⋆✦⋆✦⋆✦⋆✦⋆✦⋆✦⋆✦⋆✦⋆✦⋆✦⋆✦⋆✦⋆✦⋆✦⋆✦
(¯`·._(_.·´¯`·._.» Copyright Notice «._.·´¯`·._)_.·´¯)
Should you wish to share this Information or FiberDoodlesbyK4TT Patterns, please share using an Official FiberDoodlesbyK4TT authorized page
Permission has NOT be granted to any 3rd Party to re-print, re-post or translate any FiberDoodlesbyK4TT products.
By utilizing any product from FiberDoodlesbyK4TT, whether by clicking over the internet, telephone, facsimile or otherwise, you agree to the Terms and Conditions of the FiberDoodlesbyK4TT End User Licensing Agreement (EULA) or qualification.
All patterns are sold in good faith. Every effort has been made to ensure that all instructions are accurate and complete. FiberDoodlesbyK4TT cannot, however, be responsible for human error or variations in individual work.
All patterns released from FiberDoodlesbyK4TT are protected under Federal copyright laws. Reproduction/distribution, in part or in whole, is strictly prohibited unless specifically authorized. This includes, but is not limited to, any form of reproduction or distribution on or through the Internet, including posting, scanning, "Crochet-A-Longs" and/or eMail transmission.


1 comment:
And yet again I bow down to you! All mighty crochet queen has stuck again!
O.O That is COOL! Thank you for sharing once again.
Hugs!
Erin
Post a Comment
Hi and thank you for leaving your thoughts on Fiber Doodles!